Quickstart
This walkthrough takes a fresh installation from its first launch to a running agent session. Start in the repository you want Mjolnir to recognize:
cd path/to/your/repositorymj1. Open the dashboard
Section titled “1. Open the dashboard”Two words come up on every screen:
- A profile is one coding-agent account: which agent (Claude Code, Codex, Kimi Code, Grok Build, Muse Code, OpenCode, or MiMo Code) and the home directory that holds its sign-in.
- A target is where the session runs: this machine directly (
localhost), a local container, an SSH host, or an EC2 instance.
When no workspace exists, Mjolnir creates one named after the current
directory. On first launch, it automatically discovers your installed agents,
adds their profiles, and creates a bundle for the current GitHub repository
when one is found. Every later plain mj launch adds profiles for agents
installed since (mj go, mj workspaces, and the relaunch after an upgrade
do not); disable a profile in Settings to stop using an agent, because a removed
profile for an installed agent comes back. A one-time welcome dialog shows the detected agents and
project, plus any prerequisite errors. Continue dismisses the dialog even
while checks are running; errors found afterward appear as dashboard notices.
Mjolnir does not start a session automatically.
Press Create, N, or prefix+c to open the creation wizard. Choose the
profile, target, project, resources, and attached directories before launch.
Launch progress and failures appear on the dashboard. When the new session is
ready, type a prompt and press Enter. Container images download in the
background without blocking the dashboard or sessions on this machine.
Use prefix+s Settings to add SSH or EC2 connections and change runtime options.
mj setup reruns agent and repository discovery from the shell. It adds new
profiles and bundles automatically, preserves your existing settings, and
reports prerequisite errors. Use it after installing another agent or to
discover another repository. It does not ask configuration questions or wait
for container images. mj doctor --smoke remains available for explicit
container smoke tests.
mj go is a shortcut for later. Run it in a project directory: the first time
it asks which profile and target to use, and after that it returns to that
folder’s last conversation. It uses the same workspace that mj created for
the folder.
If no coding agent is installed
Section titled “If no coding agent is installed”Mjolnir runs an agent you already use; it does not include one. If no agent is found, the welcome reports the missing profile. To fix this:
- Install one supported agent and sign in with it once, using that agent’s
own instructions. For example, Claude Code:
npm install -g @anthropic-ai/claude-code, then runclaude. Codex:npm install -g @openai/codex, then runcodex login. Signing in creates the agent’s home directory (~/.claude,~/.codex,~/.kimi-code,~/.grok,~/.config/muse,~/.config/opencode, or a MiMo CodeMIMOCODE_HOME). - Open Settings (
prefix+s), choose Agent Profiles, and choose Detect profiles, or runmj setupagain.
Codex, Claude Code, Muse Code, and MiMo Code sessions on this machine also need Node.js 22
or newer and npm on PATH; Mjolnir launches its own pinned copy of each agent.
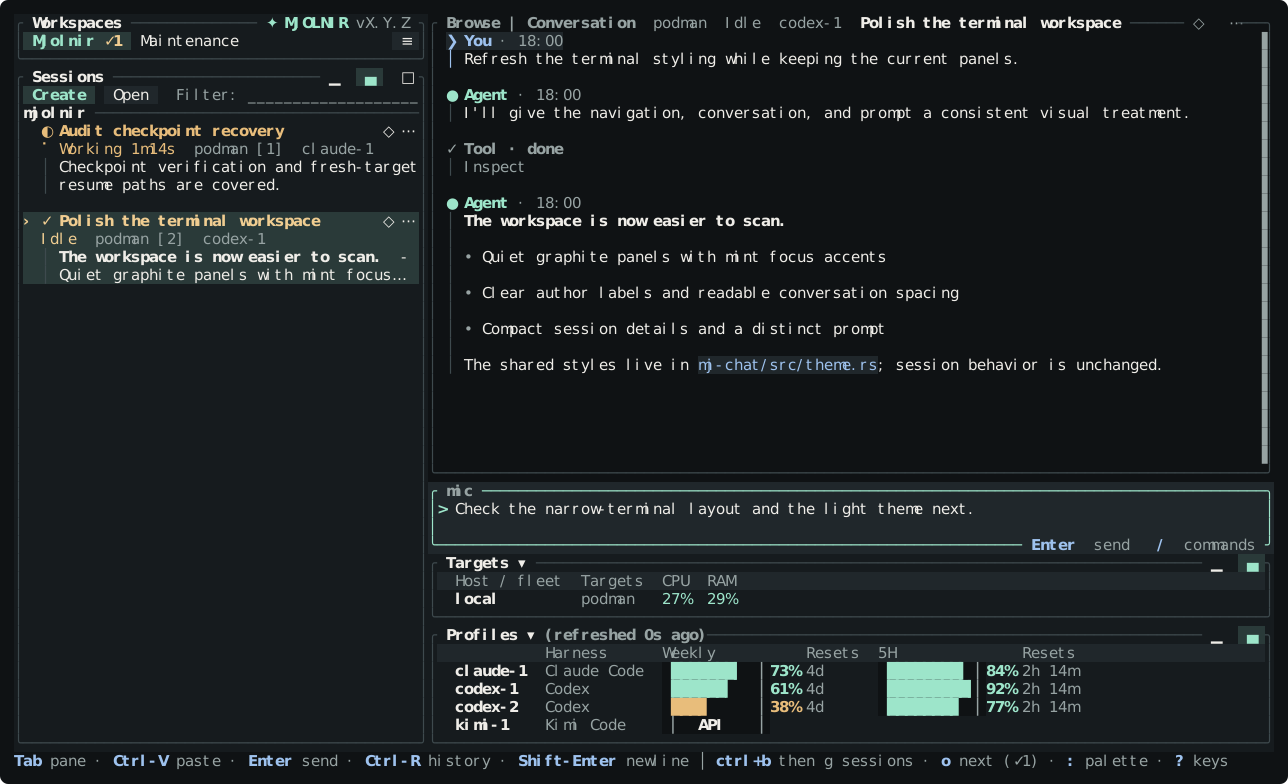
The dashboard keeps its session list, Conversation and Prompt regions, target capacity, and profile quota visible together.
You can revise every generated value later. See configuration for the file location and schema, profiles for harness credentials, and targets for execution environments.
2. Resolve any missing prerequisites
Section titled “2. Resolve any missing prerequisites”If the first session reports a prerequisite failure, detach with prefix+q, then run:
mj doctorFor machine-readable output, use:
mj doctor --jsonFix errors until the relevant profiles and targets report ready. If a harness profile needs authentication, run:
mj login --profile <profile-id>Claude Code profiles can use the long-lived setup-token flow:
mj login --profile <profile-id> --setup-tokenThe login command is profile-aware: it runs the correct harness authentication flow and stores credentials in that profile’s home. See profiles for isolation and authentication details, or troubleshooting if doctor still reports a failure.
3. Create a custom session (optional)
Section titled “3. Create a custom session (optional)”For another agent, project, or target, press Create or prefix+c from anywhere
on the dashboard. The full new-session wizard walks through:
- A harness profile.
- A target on which the session will run, including its resource size when that target is resizable.
- A project bundle, or an absolute project directory for a bare target.
- A final review, where supported targets can also receive attached directories.
When only one target is available and it has no size to set, such as
localhost on a host without Podman or Docker, the wizard chooses it and skips
step 2. The review still shows the target.
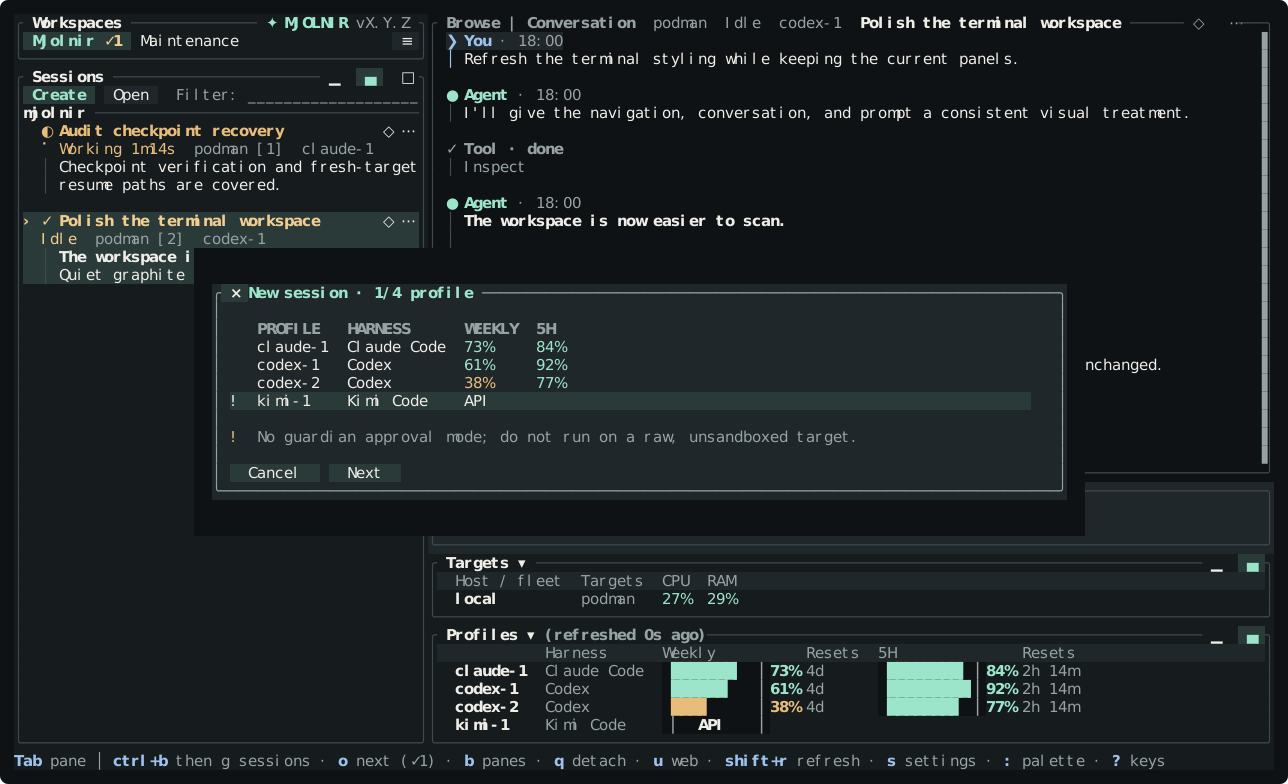
Press Enter to confirm. Mjolnir provisions the selected target in the background, starts the harness, and returns focus to the Prompt pane when the session is ready. The Sessions pane shows launch progress and reports failures instead of freezing the interface.
See sessions for lifecycle and persistence, and targets for the differences between local, container, SSH, and EC2 execution.
4. Send the first prompt
Section titled “4. Send the first prompt”Type a message in the Prompt pane and press Enter. While the harness is working you can type another message and press Enter to queue it. Press Esc to cancel the active turn without stopping the session.
Useful controls for the first run:
| Key | Action |
|---|---|
Tab / Shift+Tab | Move through Workspaces, Sessions, Prompt, Targets, and Profiles |
Page Up / Page Down | Scroll the transcript from any focus |
prefix+? | Open contextual help |
prefix+: | Open the searchable command palette |
prefix+c | Open the full creation wizard |
prefix+s | Edit configuration in Settings |
prefix+q | Detach this terminal |
The prefix is ctrl+b, the same as tmux: press it, release it, then press the second key. Every key here, including the prefix, is editable in config.toml under [keys]; see Terminal surface for the full default table and Configuration for the syntax.
The terminal surface guide covers pane sizing, the full composer keymap, the command palette, and ! shell commands.
5. Detach and reconnect
Section titled “5. Detach and reconnect”Press prefix+q when you are ready to leave the terminal. Detaching closes only this dashboard: the daemon and sessions keep running, active turns continue, and queued prompts remain queued.
Reconnect with:
mjMjolnir reopens the session in your opened workspace whose agent spoke most recently and places the cursor in its Prompt pane. Other workspaces’ sessions remain live and are available by selecting their workspace tab. To reach the same sessions from a browser, print the viewer address and access code with:
mj daemon statusSee the web viewer for browser and phone access. For workspace selection, scripting, daemon operations, and every command-line flag, use the CLI reference.
What a session does to your repository
Section titled “What a session does to your repository”On the localhost target, a new session gets its own Git clone at
.mj/clones/<id> inside your repository. The clone starts on the default
branch of your origin remote (on your current branch when there is no
remote, or on the branch you name with mj new --branch), and its origin is
the same remote as yours. Your checkout is not changed: its branch, its files,
and any uncommitted changes stay as they are, and Mjolnir adds no branch to
your repository. To let the agent edit your checkout directly instead, clear
Create isolated checkout on the wizard’s review step. Container, SSH, and
EC2 targets also work in their own clone and do not touch your checkout.
To get the work out:
- Print the diff:
mj diff --session <id>. - Write a patch file:
mj export --session <id> --kind patch --out work.patch. - Push it as a branch:
mj export --session <id> --kind branch --branch <name>pushes the session’s work tooriginas<name>. - Look at the clone itself:
git -C .mj/clones/<id> log. Its commits are not in your repository until they are pushed. - In the dashboard,
prefix+dlists the changed files.
Destroy session… removes the clone and its recovery copy. Work that was not pushed or exported is lost.
What it costs
Section titled “What it costs”Mjolnir itself is free. Every agent turn, every automatic review, and every automatic continuation turn uses your agent subscription’s quota, the same as if you ran the agent yourself. The Profiles pane shows what is left. EC2 targets start instances in your AWS account, and AWS bills you for them until the session is suspended or destroyed. Nothing else is billed.
By default Mjolnir sends recent prompt and reply text to TypeSafe’s Jev classifier through a public proxy. Security boundaries lists everything that leaves your machine.
Bring in a session from another tool (optional)
Section titled “Bring in a session from another tool (optional)”The Import tab of the session dialog (prefix+g) and mj import adopt a
session you started directly in Claude Code, Codex, Kimi Code, Grok Build, or
Muse Code. OpenCode and MiMo Code sessions use SQLite stores that are not
importable yet. Import only reads your repository: it archives the tracked changes
into Mjolnir’s data directory and does not change the checkout. When the
imported session has a single Git root, resuming it runs the agent in that live
checkout, not in a new clone. See sessions.
Stopping and uninstalling
Section titled “Stopping and uninstalling”Each way of stopping leaves a different amount running:
| Action | What stops | What keeps running |
|---|---|---|
prefix+q (detach) | This dashboard only | The daemon, every session, and active turns |
Suspend session… (prefix+shift+x) or mj suspend --session <id> --acknowledge-unpublished-work | That session’s agent and target; a recovery copy is saved for Resume | The daemon and other sessions |
mj daemon stop | The daemon | Session workers and their targets, including EC2 instances; the next mj reconnects to them |
Destroy session… or mj destroy --session <id> | That session’s target, its clone, and its recovery copy. The conversation is archived: mj sessions --session <id> lists it as archived, and mj resume --wiki <id> starts a new session from it | The daemon and other sessions |
mj suspend needs --acknowledge-unpublished-work for a session that works
in its own clone, because while the session runs Mjolnir cannot check whether
its commits have reached a remote; the recovery copy keeps unpushed work
either way. The dashboard’s Suspend dialog says the same and needs no flag.
To stop everything, suspend or destroy each session first, then run
mj daemon stop. mj sessions lists what is still live.
To uninstall after that:
- Remove the programs. The release installer put
mj,mj-desktop,mj-voice-worker, and themj-worker*files in~/.local/bin(orMJOLNIR_INSTALL_DIR). For npm, runnpm uninstall -g @brokkai/mjolnir. - Remove the configuration directory:
~/.config/mjolniron Linux, or the path inMJ_CONFIG_DIR. - Remove the data directory, which holds the session database, recovery
archives, logs, and project memory:
~/.local/share/mjolniron Linux, or the path inMJ_DATA_DIR. Deleting it deletes every suspended session. - Remove the cache, which holds Git mirrors and the pinned agent installs:
~/.cache/mjolnir, or$XDG_CACHE_HOME/mjolnirwhen that is set. - In each repository you used, delete the
.mjfolder, which holds only the session clones:rm -rf .mj. Sessions made by older Mjolnir versions used linked worktrees under.mj/worktreesonmj/<id>branches; remove those withgit worktree removefirst, and delete themj/<id>branches you no longer want. - Remove the session index, which holds searchable copies of your agent
conversations:
~/.local/share/sessionwikion Linux, or~/Library/Application Support/sessionwikion macOS. It also indexes sessions you ran outside Mjolnir. Keep it if you use SessionWiki on its own. - Remove the installer’s checksum cache:
~/.cache/mjolnir-installer. - If you let the installer change your shell profile (for example
~/.bashrc), delete the two lines it added:# Added by mjolnir installerand theexport PATH=...line after it. - Mjolnir 2.21.0 and earlier left
projects/hel-<key>-<session>folders in the agent’s home for sessions onlocalhost, for example in~/.codex/projectsor~/.claude/projects. Later releases remove those of ended sessions when the daemon starts. Delete any that are left. In~/.claude/projectssuch a folder also holds that session’s Claude Code transcript.
On macOS the configuration and data directories are both
~/Library/Application Support/mjolnir.